Using Microsoft Dev Box and Azure Compute Galleries for Bioinformatics
Microsoft Dev Box is an Azure-based is a managed service that allows developers to create on-demand workstations in the cloud. They’re designed to be “ready-to-code”, high performance, and secure for your projects. This service was announced to be in Public Preview on August 15, 2022, and so I thought I’d take it for a spin.

As a cloud architect, I almost always recommend PaaS or SaaS offerings (such as Databricks or Azure Machine Learning) over IaaS offerings (like plain VMs), but sometimes you just need a VM. At the enterprise level, though, it can be cumbersome to manage tons of VMs that get provisioned by multiple people across the org.
After about ten seconds playing with my first Dev Box, I realized this tool could also be excellent for bioinformatics teams who use developer tools to create pipelines, perform analyses, etc.
Once you get your Dev Center and Project set up (see here or see my instructions after the divider in this post), you can add a new Dev Box at https://devbox.microsoft.com/.

The base Dev Box Definitions are all Windows 10 or 11 Enterprise, which you can then install whatever software from a fairly blank slate.

If you want to make a custom image that comes with your favorite tools pre-installed, I’ll show you how to do that next…
Making a Custom Bioinformatics Image
Creating a Bioinformatics Compute Gallery
A Compute Gallery allows you to create and share compute images with users in your organization. These images can be used for various purposes, not just Dev Box.
From the Azure Portal, search for “gallery” and select Azure Compute Galleries. Create a new Gallery. I called mine bioinformaticscomputegallery.

BYO-VHD
Making a template VM image for your Dev Boxes is fairly straightforward. They use .vhd image files, which can be generated by a number of tools, both inside Azure and by tools like Hyper-V locally.
In Azure, you can spin up a traditional VM, install a bunch of software, and then create a .vhd image of the machine using these instructions.
I’m using a modified/updated/botched version of the Genomics Data Science Virtual Machine (GDSVM), which is a template by the Genomics team at Microsoft Research, updated to Windows 11 and grab its .vhd.
** You’ll need a Windows 10 or 11 Enterprise .vhd for this to work.**
Upload your desired .vhd image file to a Storage Account.
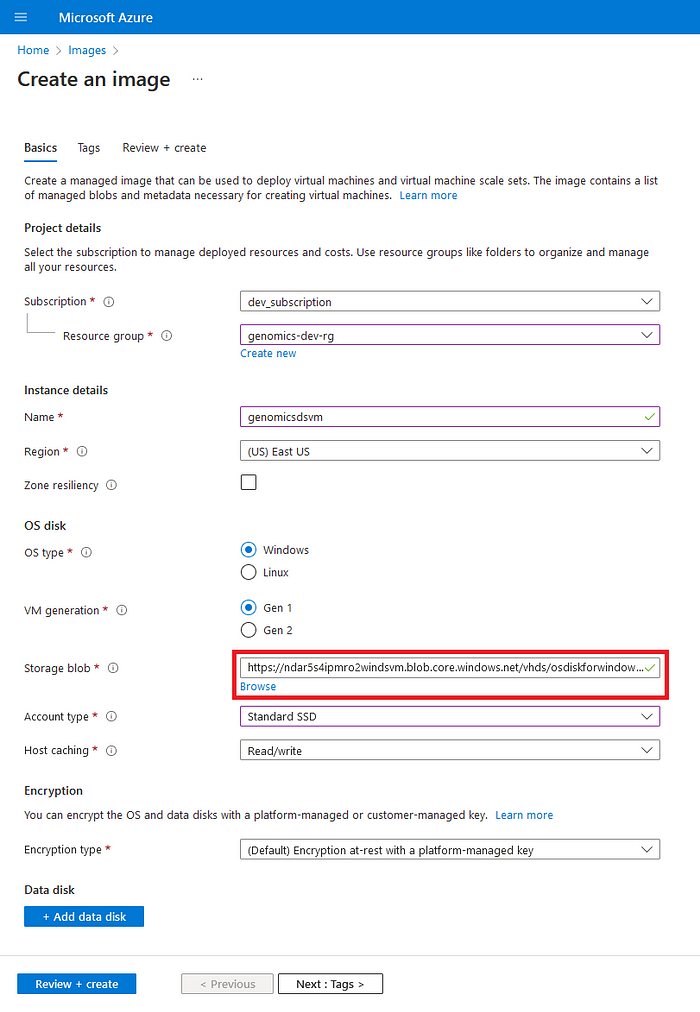
Next, register the Image. In the Portal, search for “images” (or click here) and click the + Create button.

On the Create an image page, fill in the information about your image and point to the .vhd file in your Storage Account.
This will take a bit to deploy. Once it’s finished, you can move on to the Image Definition creation.
Making a VM Image Definition
From your Compute Gallery, click + Add and + VM image definition.

On the Basics tab of the Create a VM image definition page, fill in the basic information about the image. Note: You must choose “Trusted launch” for the Security type.

Then, on the Version tab, make sure to point to the Source image you just made.

Dev Box Definitions
The next step is to create a Dev Box Definition, which basically just points to an Image and defines the VM size.

On the Create dev box definition page, fill in the information and make sure to point to the image you just created.

Making a Project
Under the Manage section of the Dev Center, create a Project. I named mine bioinformatics-project-1 just for testing.

Make sure to give users access to your Projects.

You’ll need to grant users “DevCenter Dev Box User” and admins “ DevCenter Project Admin” before they can see/create Dev Boxes.
Creating a Dev Box Pool
From within the Project you just created, click the + Create button at the top to create a new Dev Box Pool.

Select your Network Connection and Definition that you created during your Dev Center setup. I called mine bioinformaticsdevboxpool. Make sure to select the Definition that you just created.

Making a New Dev Box
Finally! You can now create Bioinformatics Dev Boxes at https://devbox.microsoft.com/
Whew…that took a lot of steps, huh?

A couple pros:
- Once set up properly, this could be really useful for data science or bioinformatics teams that need machines with lots of pre-installed tools.
- This allows for easier management of machines from an enterprise standpoint to keep your IT people happy! :)
- You can connect the Dev Center to various networks. This, in theory, would also mean that you can connect to on-prem resources to analyze local data on a Box.
A couple cons:
- This service is still in Preview, so a lot of things can change.
- Only Windows 10 or 11 .vhd images are supported at this time (sorry, Linux peeps)
- There are a lot of steps to getting this working and the documentation is a bit all over the place.
- You seem to need Microsoft Intune at your org for this to work, though I haven’t seen that requirement explicitly called out in the docs.
A couple notes:
- This post is more of a proof-of-concept, but I’ll be working on some actual assets for using Dev Box for bioinformatics soon.
- An open-source initiative should be for all of us to create some community images for bioinformatics as this doesn’t yet exist. The existing GDSVM image’s OS is unsupported in Dev Box, hence why I had to cobble together a frankenimage for this post.
Below, you’ll find my instructions for creating a Dev Center, Identities, Networking, etc.
Stay Curious…
Creating A Dev Center
If you’d like to create a Dev Center for yourself, go to Microsoft Dev Box — Microsoft Azure. There are actually quite a few steps to get this set up, so I’ll include the instructions here. The general documentation is here.
From the Azure Portal, search for “”. Click the + Create button at the top to create a new Dev Center. The Dev Center will house all of your Dev Boxes.

Fill in the Subscription, Resource Group, and Region info and give your Dev Center a name. I called mine genomicsdevcenter.

Once your Dev Center is finished deploying, you’ll now need to add a User Assigned Managed Identity.

Configure the User Assigned Managed Identity using the instructions here and add it as an Owner to the Dev Center.
Next, create a new Network Connection. (Note: This is found under the Dev Box here.)

I created a connection with existing VNet that I had and called it devboxnetwork.

Back in your actual Dev Center, you’ll need to add this Network Connection.

From here, you can refer back to the start of this post to start making your first custom Dev Box.
Thanks for reading!