How to Deploy Shiny Apps in Azure and use your Domain Name
Recently, a Shiny-based research app that I run, called StrainHub.io, went down. It was previously hosted on a free service, but it was time for me to bite the bullet and host it myself on a more performant compute environment in Microsoft Azure.

I realized that while it wasn’t that difficult to get my Shiny app running on Azure, there were quite a few steps involved that may not be obvious if you’ve never done it before. So, I’m here to fill you in!
Disclaimer: I own and run a Microsoft and Databricks partner consulting firm called <Tuple>, which pays for this hosting of this otherwise free/open-source tool.
Make Your Docker Image
The main thing you need to do is package your Shiny app in a Docker container. Your Dockerfile might look something like this:
This Dockerfile uses the rocker/shiny-verse base image and then installs all the Linux and R dependencies to run the app. Then, we copy the app files from your local directory over to the container, expose port 3838, and start the server.
Once you’re finished building the containerized version of your Shiny app locally, you’ll need to push the image to a container registry.
- If you’re wanting to deploy a public app, you can following these instructions to push to Docker Hub: https://docs.docker.com/get-started/04_sharing_app/
- If you’re wanting to deploy a private/proprietary application, you can use Azure Container Registry and privately host the image in Azure: https://learn.microsoft.com/en-us/azure/devops/pipelines/ecosystems/containers/acr-template?view=azure-devops
Make a Web App
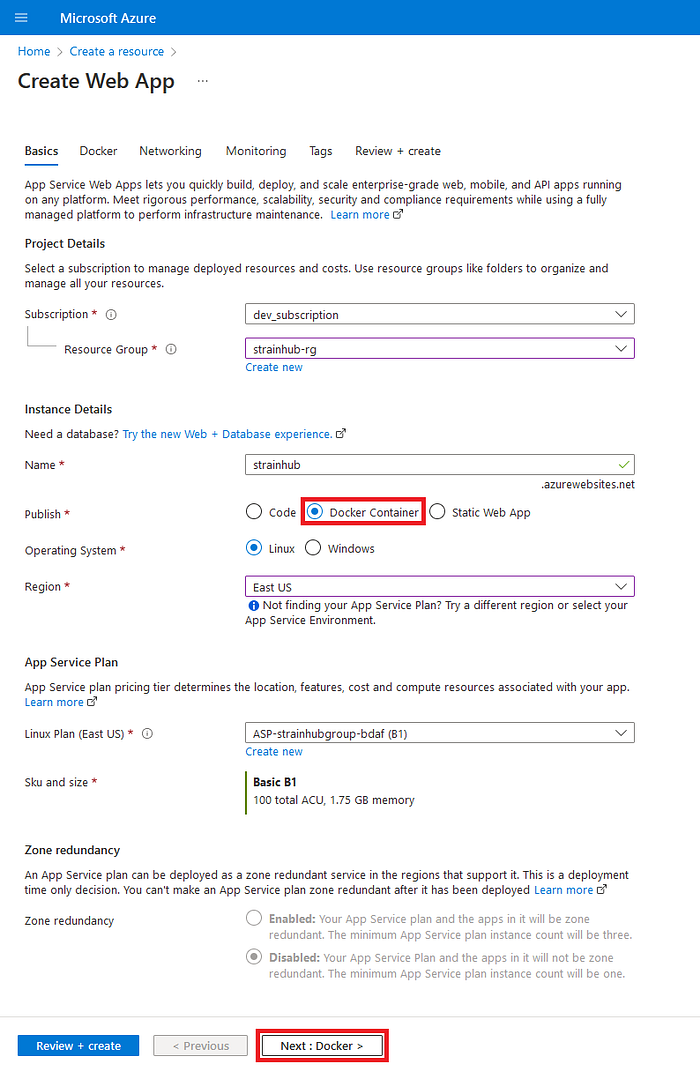
From the Azure Portal, create a new Web App service.

In the Create Web App form, pick the Resource Group and give your Web App a name. Make sure you select “Docker Container” as the Publish option. You’ll also need to create an App Service Plan, which is the underlying compute service for the app. Make sure to pick a compute size that will fit the needs of your Shiny app.
Once you’re finished filling out this information, click the Next: Docker > button at the bottom.
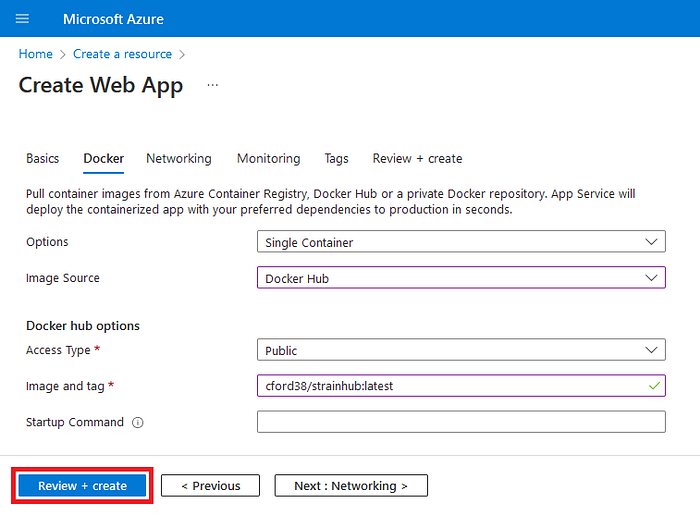
On the next screen, fill in the information about your Docker image. For the Image Source, you should select “Docker Hub” or “Azure Container Registry” (depending on where you have your image hosted).
- If you’re using the Docker Hub option, you’ll then type in your image and tag (in the <user>/<image>:<tag> format).
- If you’re using the Azure Container Registry option, you’ll pick the Container Registry, image, and tag via the drop-down boxes.
Once done, you can click the Review + create button and start the app deployment.
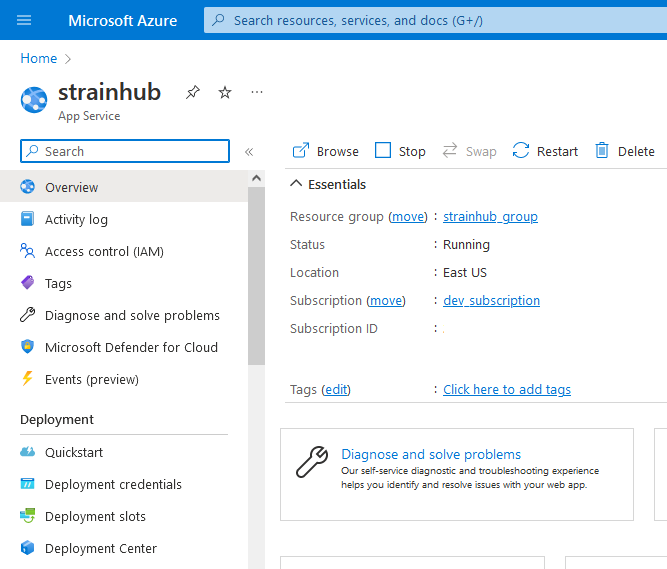
Once Azure is done deploying the web app, you’ll see it in the Portal…but it won’t work just yet.
3838 is imPORTant
Since Shiny runs on port 3838 (which is different from the default 8080), we’ll need to tell the App service to look elsewhere.
On the side panel, look for Configuration. Then, add a new setting by clicking + New application setting.
The new setting should be called WEBSITES_PORT with a value 3838.

Back on the Overview tab, click the Restart button.

Once the app restarts, you’ll be able to visit your Shiny app at: <APPNAME>.azurewebsites.net.
Using Your Own Domain Name
If you’ve purchased a domain name and you want to use it for your Shiny app, this will take a little effort…but is totally doable.
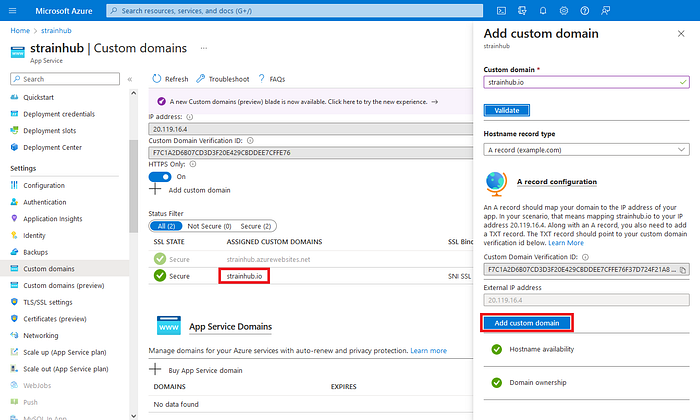
Navigate to the Custom domains tab of your Web App and click on the + Add custom domain button.
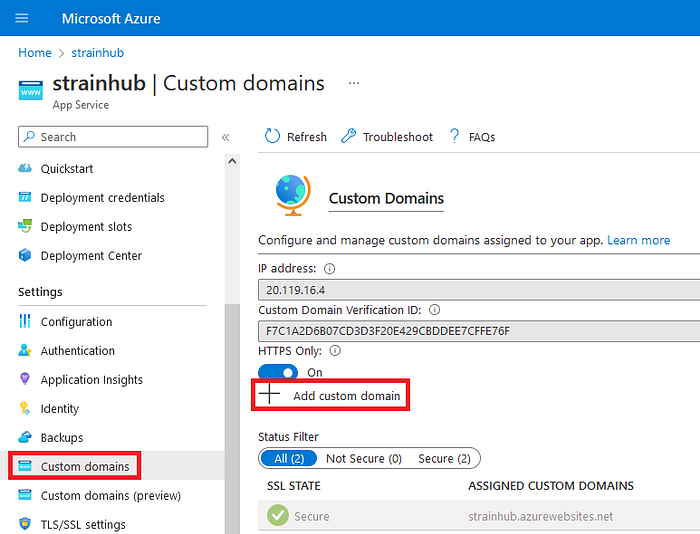
On the Add custom domain blade that pops up to the right, fill in the domain name that you want to use.

Before we can use this domain, Azure wants to verify that you own it.
Copy the Custom Domain Verification ID and External IP address to a notepad for use in the next step.
DNS Configuration
Next, navigate to your domain provider (in my case, that is GoDaddy.com), and go to the DNS of your domain.
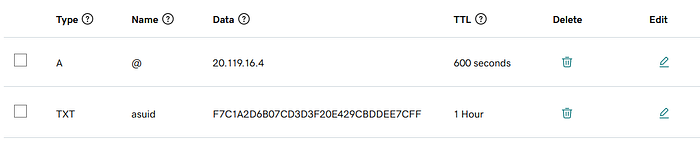
In your DNS, add the following records:
- A record — Name: @, Value: <External IP Address from before>
- TXT record — Name: asuid, Value: <Custom Domain Verification ID from before>
Once you add these records, give the DNS some time to update. Then, navigate back to your Web App in the Azure Portal.
Go back to the Add custom domain panel from before.
If done properly, you should get the ✅ for domain ownership, after which you can click the Add custom domain button.
You’ll then see your custom domain on the domains list.
Configuring SSL
At this point, your app will be available at your domain name…but won’t be secured behind an SSL certificate. If you don’t know what this means, it means that going to https://<yourdomain.com> will show a security warning due to the unencrypted connection between your browser and the website.
To fix this, you can pay for a SSL certificate in Azure and alleviate this security issue.
Getting an SSL Certificate
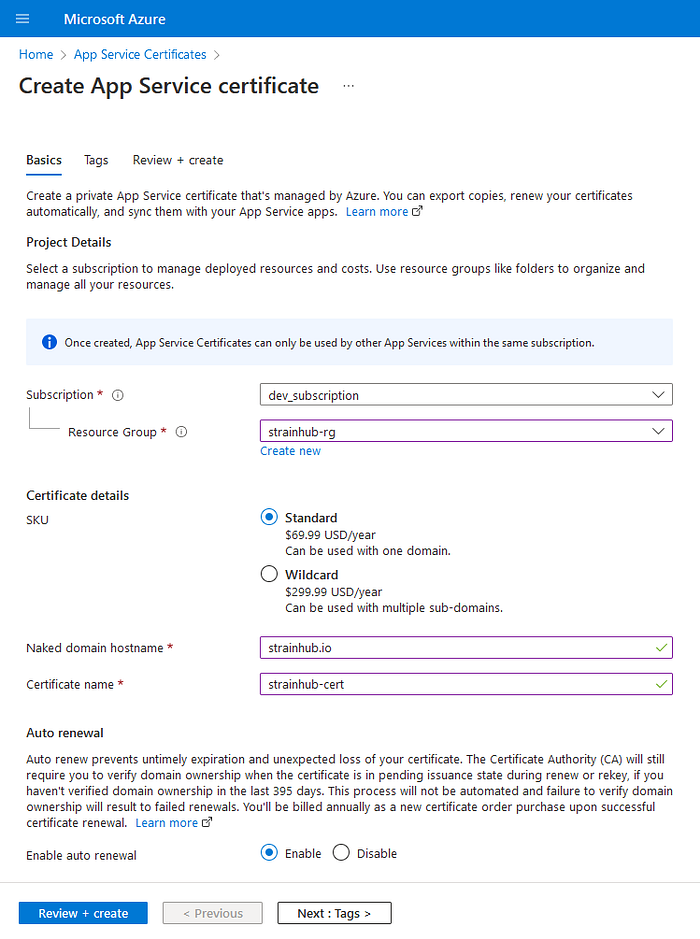
In the Azure Portal, search for “App Service Certificate” in the Marketplace (or click here).
In the Create App Service certificate screen, select the Resource Group you used for the Web App service. If you want to use the certificate for just one domain, pick the “Standard” SKU. Otherwise, pick “Wildcard” to use it for multiple subdomains.
Next, specify your domain name (without “www.” or “https://”) and name the certificate (like “<domain>-cert”).
Once you’re done, you can click the Review + create button and create the certificate.
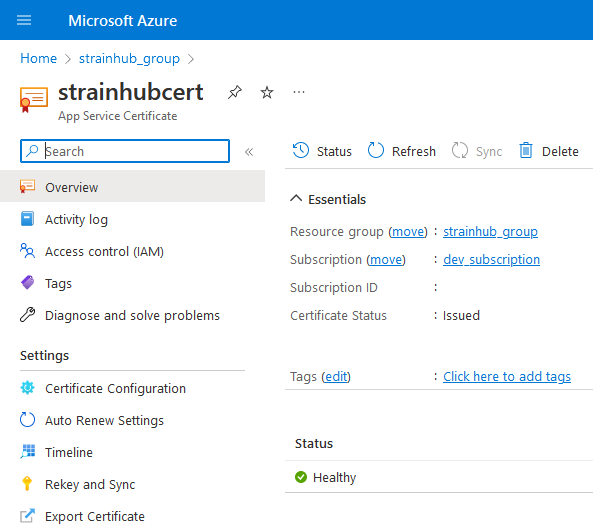
Once Azure is finished deploying the certificate, you can see it in the Portal.
You’ll now need to complete 3 “easy” steps to configure the SSL certificate.
On the App Service Certificate’s side menu, click on Certificate Configuration.
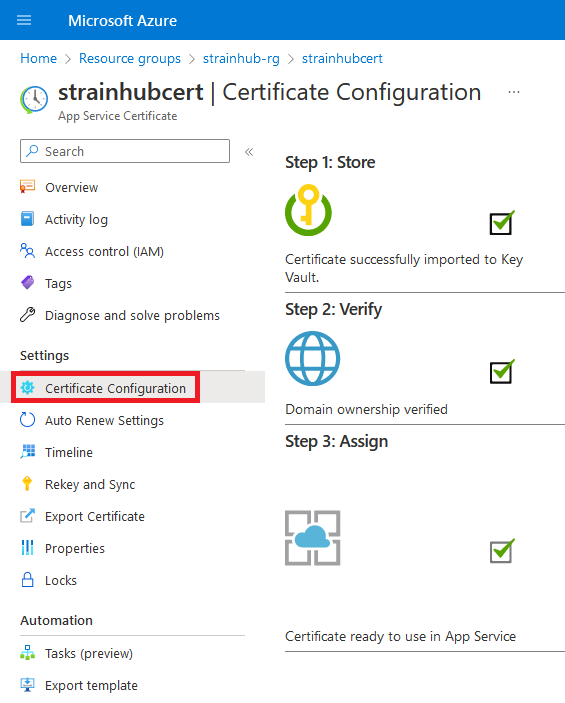
For Step 1, you’ll need to select a Key Vault where Azure will store this certificate. To learn how to create a Key Vault, visit: https://learn.microsoft.com/en-us/azure/key-vault/general/quick-create-portal. The tool will do most of the work here. You’re simply picking which Key Vault in which Azure should store your certificate.
For Step 2, you’ll be verifying domain ownership (again). Copy the string that Azure gives you. Navigate back to your domain’s DNS (such as on GoDaddy.com) and create a new record:
- TXT record — Name: @, Value: <Verification ID from Step 2>

For Step 3, head back to your Web App’s screen in the Portal and read below.
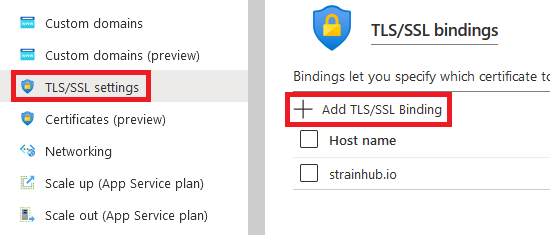
Binding your SSL
On the Web App’s TLS/SSL settings tab, click on the + Add TLS/SSL Binding button.
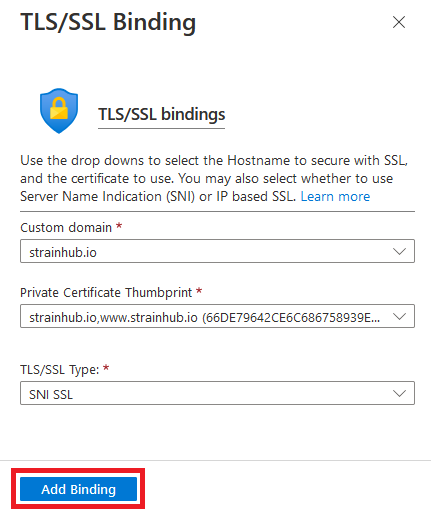
Then, in the TLS/SSL Binding blade that pops up to the right, select your domain and then find the Private Certificate Thumbprint that you just created. When finished, you can click the Add Binding button.
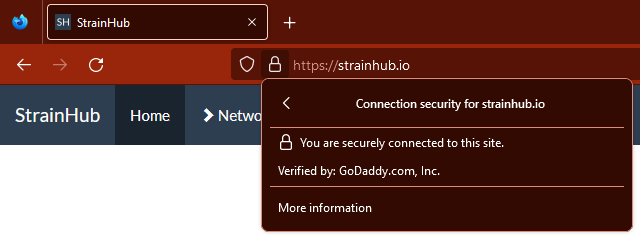
Ta da! Now the traffic to your application will be routed through HTTPS, which will make your browser’s security check happy.
If you navigate to your app’s URL, you’ll now see that the connection is secured and that the domain has been verified.
Size, Costs, and Final Thoughts
Earlier in this post, I glossed over the fact that there are different compute sizes we can select for our App Service Plan…however, compute size matters.
Here are the tiers:
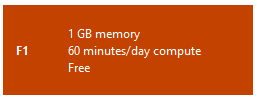
- Free Tier — Gives you 60 minutes/day at no cost, but you can’t use custom domains and it only has 1GB of storage space and 1GB RAM. Good for development use cases. You can always select this tier and then scale up later once you have the app working.
- Basic Tier — Good for most general use cases. Ranges between 1.75GB-7GB of RAM with 10GB of storage. $13–$51/month.

- Standard Tier — Similar to basic except this tier uses dedicated compute resources and allows for auto-scaling for production workloads. Ranges from 1.75GB-7GB of RAM with 50 of storage. $69-$277/month.

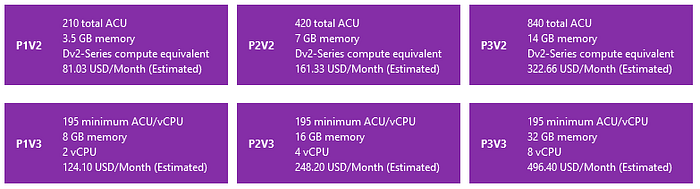
- Premium Tier — Larger, dedicated compute resource with auto-scaling capabilities for production workloads. Ranges from 3.5GB-32GB of RAM with 250GB of storage. $81–$496/month.
- Isolated tier — The best compute with dedicated vCores. Comes with auto-scaling. Good for environments where you need isolated networking and more control over your app’s environment. Ranges from 8GB-32GB of RAM and 2–8 vCPUs with 1TB of storage. $292–$1171/month.

When selecting the size of your App Service Plan, you want to pick the appropriate tier for your specific needs. If you’re hosting a basic web application that doesn’t need a lot of horsepower, something in the Basic or Standard tiers would be fine. If you’re running an enterprise-grade, super secure app that needs to process quite a bit of data, picking a higher tier would be necessary for ample performance. Note: You can always resize your App Service Plan later.
That’s it! In this post, we’ve covered how to deploy a containerized Shiny app to Azure Web Apps and how to use your own domain. In this process, we’ve created an
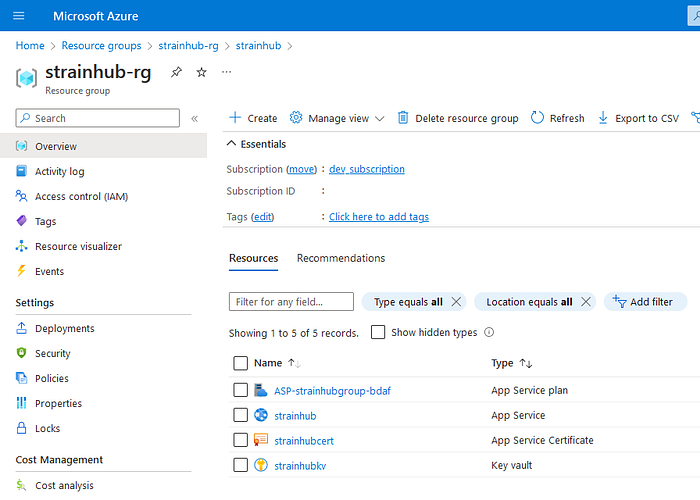
- Web App service — The service that is running our Docker image of the Shiny application.
- App Service Plan — The compute backend for the web app.
- App Service Certificate — Allows us to use SSL encryption when users connect to our app.
- Key Vault — Holds our certificate.
This process will make your Shiny app professional-looking, secure, and performant in the cloud.
To learn more about StrainHub, you can read our paper here: https://academic.oup.com/bioinformatics/article/36/3/945/5550625 or run the Shiny app and R package yourself from here: https://github.com/colbyford/StrainHub
Stay Curious…