Building GPU-Enabled Clusters in Azure Kubernetes Service
When deploying containerized applications like APIs or web apps in the Azure cloud, we have a lot of compute options to choose from. Whether it’s Azure Functions, Azure Web Apps, or Azure Container Instances, these services make it easy to get your container up and running. However, when we need a GPU to accelerate things like AI/LLM inferencing, video rendering, or certain scientific workloads, the previously mentioned services just won’t cut it. For that, we turn to Azure Kubernetes Service!

Today, I’ll show you how to create a simple, GPU-enabled node pool in an Azure Kubernetes cluster where you can serve containers of larger AI models or scientific workloads with CUDA-accelerated performance.
Creating an AKS Cluster
Note: If you already have an Azure Kubernetes Service (AKS) cluster, you can skip this step. This tutorial is using the Azure CLI, which you can either run locally or in the Azure Cloud Shell.
If you don’t have the Azure CLI installed, you can get here: How to install the Azure CLI | Microsoft Learn
First, make sure you’re logged into your Azure Tenant and have your desired Subscription set.
## Login
az login

## Set Subscription
az account set --subscription "xxxxxxxx-xxxx-xxxx-xxxx-xxxxxxxxxxxx"
Define some environment variables for Resource Group, Region, and cluser. Using environment variables will help keep the az cli commands general if you want to change from the demo names I’ve given here.
export AKS_RESOURCE_GROUP_NAME="rg-k8sdemo-dev-eastus-001"
export AKS_REGION="eastus"
export AKS_CLUSTER_NAME="kub-k8sdemo-dev-eastus-001"
Note: It’s a good idea for you to come up with a naming convention for your organization. I loosely follow the Cloud Adoption Framework naming from Microsoft here: Define your naming convention — Cloud Adoption Framework | Microsoft Learn
Provision a Resource Group and an AKS cluster.
## Create Resource Group
az group create \
  --name $AKS_RESOURCE_GROUP_NAME \
  --location $AKS_REGION

## Create AKS Cluster
az aks create \
  --resource-group $AKS_RESOURCE_GROUP_NAME \
  --name $AKS_CLUSTER_NAME\
  --node-count 1 \
  --generate-ssh-keys
Once the CLI commands complete, you should see your Resource Group

… and your AKS cluster.

Next, get the credentials to the AKS cluster. This will allow us to use kubectl commands later.
az aks get-credentials \
  --resource-group $AKS_RESOURCE_GROUP_NAME \
  --name $AKS_CLUSTER_NAME
Enabling GPU Support in AKS
Currently, GPU support on Azure Kubernetes Service (AKS) is in preview. This means that there are features that are subject to change, but the current functionality certainly works.
To start, we must enable the aks-preview extension and the ContainerService feature, which gives us GPU support.
## Register the `aks-preview` extension
az extension add --name aks-preview

## Update the `aks-preview` extension
az extension update --name aks-preview

## Register the GPU feature in the ContainerService namespace
az feature register \
  --namespace "Microsoft.ContainerService" \
  --name "GPUDedicatedVHDPreview"

az provider register
  --namespace Microsoft.ContainerService
Creating a GPU-Enabled Node Pool
Creating a node pool defines the VM type of the nodes to be used. So, in this example, I’m making a node pool that can scale to three NC24ADS nodes. These each have 24 vCPU cores, 220 GiB of RAM, and an NVIDIA A100 GPU with 80GiB of GPU memory.
az aks nodepool add \
  --resource-group $AKS_RESOURCE_GROUP_NAME \
  --cluster-name $AKS_CLUSTER_NAME \
  --name gpupool \
  --node-count 1 \
  --node-vm-size standard_nc24ads_a100_v4 \
  --node-taints sku=gpu:NoSchedule \
  --aks-custom-headers UseGPUDedicatedVHD=true \
  --enable-cluster-autoscaler \
  --min-count 1 \
  --max-count 3
Note: There are lots of different types of VMs in Azure that have GPU(s). You can read more about them here. I’m using a rather large GPU as it’s what I had access to in my Subscription.
Given the AI boom, many GPU types may not be available in your region. Feel free to modify the VM type to any NC/ND-prefixed SKU to complete the demo.
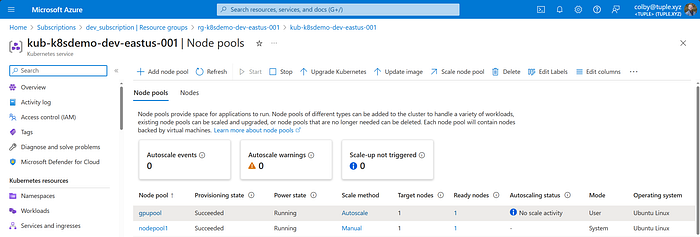
Once you create the node pool, you should see it along with the default node pool that was created as part of the K8s setup.
Provision a GPU Pod
Next, create a YAML file that contains the specs for a pod that uses a PyTorch container. Note that this pod doesn’t do anything, except for staying awake long enough for us to prove that we can access the GPU on the pod.
apiVersion: v1
kind: Pod
metadata:
  name: aks-gpu-demo
spec:
  containers:
  - name: aks-gpu-demo
    image: pytorch/pytorch:2.3.1-cuda12.1-cudnn8-runtime
    command: [ "/bin/bash", "-c", "--" ]
    args: [ "while true; do sleep 30; done;" ]
    imagePullPolicy: IfNotPresent
    resources:
      limits:
       nvidia.com/gpu: 1
  restartPolicy: OnFailure
  tolerations:
  - key: "sku"
    operator: "Equal"
    value: "gpu"
    effect: "NoSchedule"
Save the above lines to a file named aks-gpu-demo.yaml.
Lastly, apply the YAML to the cluster, which will spin up a pod called aks-gpu-demo in our gpupool and pull the container image.
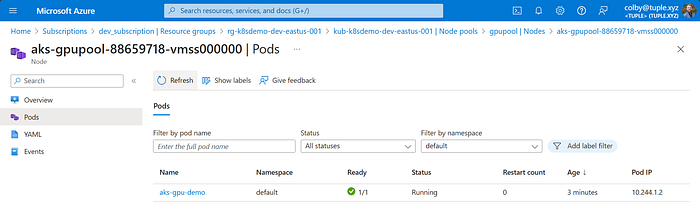
kubectl apply -f aks-gpu-demo.yamlOnce you apply the YAML file for the pod, it’ll take a couple minutes to pull the image from Docker Hub. Then, you should see that the pod has a “Running” status when it’s ready.
Remoting into the pod
Once the pod is up and running and has pulled the container image, we can remote into to the pod (into a Python interactive session) using the following command:
kubectl exec --stdin --tty aks-gpu-demo -- pythonOnce you’re in the Python interactive session, import PyTorch and test if it can see the GPU.
import torch

## This should be True
torch.cuda.is_available()

## This should tell us the name of the device
torch.cuda.get_device_name(0)
Voila! ✅We can see that the PyTorch container can see the GPU on the pod in your AKS cluster. You can now run your CUDA workloads in this pod.
Once you’re done, remember to delete any pods, node pools, or even the entire AKS cluster if you’re not going to use them after this tutorial. Save yourself some 💲.
## Delete the pod
kubectl delete pod aks-gpu-demo

## Delete the AKS cluster
az aks delete \
  --resource-group $AKS_RESOURCE_GROUP_NAME \
  --name $AKS_CLUSTER_NAME

## Delete the Resource Group
az group delete --name $AKS_RESOURCE_GROUP_NAME
Final Thoughts
In this quick tutorial, we’ve enabled GPU support on an AKS cluster, created a node pool, and then tested that it works. You can now deploy even more complex containers to this cluster.
Next, you can explore deploying AI models (such as LLMs) or performing CUDA-accelerated tasks in this node pool.
Multi-instancing
Some NVIDIA GPUs support “multi-instancing”, which is where a single GPU can be shared across instances in an AKS cluster. Multi-instancing is useful when you don’t need the entire GPU for a single task, which is common in AI inferencing on smaller models. This applies to the NVIDIA A100 GPUs, for example, which can be split into 7 instances. To learn how to create a multi-instance node pool, see: Create a multi-instance GPU node pool in Azure Kubernetes Service (AKS) — Azure Kubernetes Service | Microsoft Learn
Kubernetes for Bioinformatics
If you’ve been reading my blog for a while, you know that I specialize in cloud infrastructure for bioinformatics and genomics. I really feel like Kubernetes is a great platform to run scientific workloads. So much so, that I have developed a framework called ahab that automates bioinformatics pipelines using AKS. 🦑
Please reach out if you’d like a demo or if you’re interested in exploring Kubernetes for scaling your workloads in the cloud.
Stay Curious…